
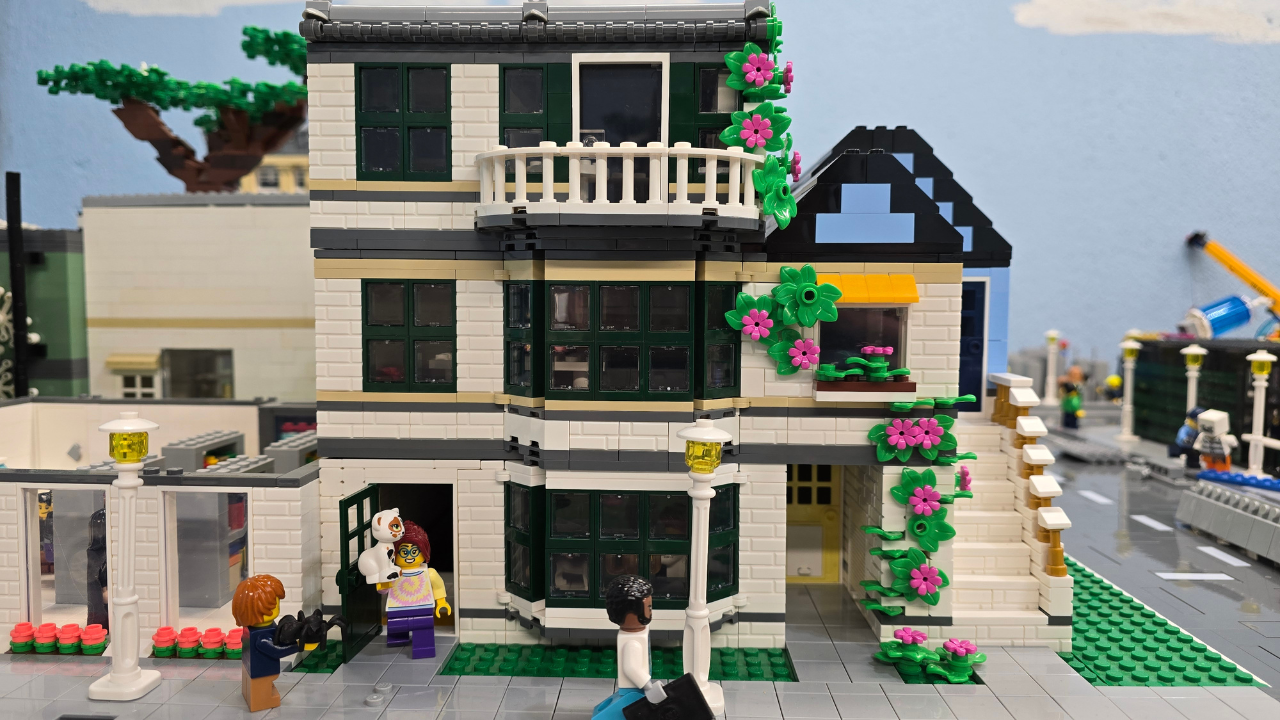
1. Realistic Vines on the Building Exterior
To give the building an overgrown, cozy feel, I added vines climbing the exterior walls. This was done using 1×1 modified SNOT bricks (Studs Not On Top) to attach leaf pieces and flowers to the wall.
In some spots, I embedded the leaf elements directly into the wall, making the vines look like they’re growing tightly against the structure. For even more realism, I used bar with clip pieces to extend vines onto the roof, where a few extra leaves suggest the plant continues to grow.
2. Detailed Rooftop Design
A great roof can make or break a LEGO build. I added character to mine using tooth pieces, bar clips, and some uniquely shaped modified plates.
One clever touch: using a 1×1 modified plate as an end cap for 1×2 bar plates, which added subtle texture. While I’m not sure of all the piece names (drop them in the comments if you know!), the variety really enhanced the final look.
3. Angled Windows with Hinges
The front of the vet clinic features windows set at a 45° angle, which adds great visual interest. This was done using 1×4 hinge plates—a simple trick that really elevates the realism.
Other fun exterior details include a pet door on a yellow door, and a tiny bike garage tucked under the stairs of the lower Airbnb—perfect for minifig renters on the go!
4. Realistic LEGO Bed Technique
Inside the vet’s upstairs apartment, I created a cozy bed using a simple technique. First, build a sturdy bed frame, then use 2×1 curved slope bricks for the blanket. Top it off with a 2×4 tile and a pillow to finish the look.
Fun detail: The bed is located next to the stairs so the vet can quickly respond to emergencies in the middle of the night!
5. Simple Animal Scale and Accessories
In the exam room, there’s a small animal scale made with 1×1 round studs and a 2×2 tile—super easy and super effective. I also included a treat for nervous pets and a sink for cleaning up. These small accessories really bring the space to life.
6. Compact Sink Design
The sink in the operating room is another fun technique. It starts with a SNOT brick, with 1×2 modified plates with clips to hold the faucet.
Then, I added panel pieces as basins, jumper plates for drawers, and faucets for that finishing touch. It’s a compact and stylish build that can fit into any LEGO home or clinic.
7. How to Build a Couch for Your Minifigs
Need a comfy waiting area? I built a simple couch using modified SNOT bricks to hold a 1×6 brick on top.
The seat base is made using bricks connected to the SNOT pieces, and by turning one of the SNOT bricks upward, you can even seat a minifigure right on the couch!
8. End Table + Lamp Build
Every cozy room needs a little side table! I made mine using 1×1 round studs for the legs, with a 2×2 plate as the tabletop.
For extra detail, I added headlamp bricks to simulate drawers. The lamp is made from just three pieces: a cone, a stud, and a radar dish. Simple and effective!
Bonus Details You Might Have Missed
The vet’s office includes a bookshelf built using the same technique as my LEGO library.
There’s a service dog with a handle for an elderly sheriff—a thoughtful accessibility feature!
The lower Airbnb has a diagonal bathroom door, a small kitchen, and more tiny home-style furnishings.
Final Thoughts
These 8 LEGO techniques helped me bring my Vet Clinic and Airbnb builds to life, and I hope they inspire you in your own city builds too. Whether you’re building cozy interiors, detailed exteriors, or functional spaces—there’s always room for creativity.
Have any questions or want to share your own techniques? Leave a comment! And don’t forget to check out the YouTube video for the full tour.
Thanks for visiting The Brick Guru, and as always—happy building!